scratch partition의 filesystem이 손상되어 hostd log를 기록하지 못한 케이스에 대해서 다뤄봅니다.
## ESXi 6.5 + vSAN
로그 분석을 위해 Support Bundle을 수집했으나, 로그가 정상적으로 수집이 되지 않는 환경이 있었으며 특히 hostd.log의 경우에는 특정 시점 이후로 대부분이 Special Character로 꽉 채워져 있는 현상이 있었습니다.
| 2022-08-19T10:53:26Z iofiltervpd[69914]: IOFVPXMLExtensions_GetXMLDataFile:125:xmlDataFile queried: /usr/lib/vmware/iofilter/server/vasaServiceSoap12Binding.queryCapabilityProfileForResource.res.xml 2022-08-19T10:53:26Z iofiltervpd[69914]: IOFVPXMLExtensions_GetXml:160:Processed XML file successfully. 2022-08-19T10:53:26Z iofiltervpd[69914]: queryCapabilityProfileForResource:759:queryCapabilityProfileForResource() successful ^@^@^@^@^@^@^@^@^@^@^@^@^@^@^@^@^@^@^@^@^@^@^@^@^@^@^@^@^@^@^@^@^@^@^@^@^@^@^@^@^@^@^@^@^@^@^@^@^@^@^@^@^@^@^@^@^@^@^@^@^@^@^@^@^@^@^@^@^@^@^@^@^@^@^@^@^@^@^@^@^@^@^@^@^@^@^@^@^@^@^@^@^@^@^@^@^@^@^@^@^@^@^@^@^@^@^@^@^@^@^@^@^@^@^@^@^@^@^@^@^@^@^@^@^@^@^@^@^@^@^@^@^@^@^@^@^@^@ ^@^@^@^@^@^@^@^@^@^@^@^@^@^@^@^@^@^@^@^@^@^@^@^@^@^@^@^@^@^@^@^@^@^@^@^@^@^@^@^@^@^@^@^@^@^@^@^@^@^@^@^@^@^@^@^@^@^@^@^@^@^@^@^@^@^@^@^@^@^@^@^@^@^@^@^@^@^@^@^@^@^@^@^@^@^@^@^@^@^@^@^@^@^@^@^@^@^@^@^@^@^@^@^@^@^@^@^@^@^@^@^@^@ |
다행히도 다음과 같은 로그가 기록되어 있어 Filesystem 관련 내용을 확인할 수 있었습니다.
| 2022-09-08T02:01:42.694Z cpu75:156329376)WARNING: VFAT: 3236: hostd.log: Possible FAT corruption!: offset not found: 0x1c0000, length 8192, seekOffset 0x0. File length: 4749001, status: Not found. FS check will run during shutdown. |
그렇다면, 우선 hostd.log 파일이 위치하는 곳이 어디인지를 확인해야 합니다.
로그 파일들은 기본적으로 scratch partition이라고 불리는 곳에 위치해 있으며, Support Bundle에서는 다음 위치에서 설정 내용을 확인할 수 있습니다.
| vmware-vimdump_-o----U-dcui.txt (vim.option.OptionValue) { dynamicType = <unset>, dynamicProperty = (vmodl.DynamicProperty) [], key = 'ScratchConfig.CurrentScratchLocation', value = '/vmfs/volumes/5d4315b9-166e3b62-c13d-e4434b523bc0' }, |
설정에서 확인한 볼륨인 /vmfs/volumes/5d4315b9-166e3b62-c13d-e4434b523bc0의 파일시스템을 확인해보면, 다음과 같이 vfat 으로 되어 있습니다.
| df.txt Filesystem Bytes Used Available Use% Mounted on VMFS-6 231928233984 36558602240 195369631744 16% /vmfs/volumes/DE400191700013-01-01-service-datastore1 vfat 299712512 219226112 80486400 73% /vmfs/volumes/5d4315a2-fcdd2b5e-fa59-e4434b523bc0 vfat 261853184 195215360 66637824 75% /vmfs/volumes/5995247b-1e869143-ae0a-298f8b758747 vfat 4293591040 545980416 3747610624 13% /vmfs/volumes/5d4315b9-166e3b62-c13d-e4434b523bc0 vfat 261853184 175042560 86810624 67% /vmfs/volumes/fa190370-f39c9076-5e91-3bcec7c2cfdf vsan 192037257216000 75137743323136 116899513892864 39% /vmfs/volumes/VxRail-Virtual-SAN-Datastore-8990572b-4bc0-4d24-8e85-6a8a473a13b5 |
해당 파일시스템, 볼륨이 위치한 Partition 및 Physical Disk도 추가로 확인해보면 다음과 같습니다.
| vmkfstools -P -v10 /vmfs/volumes/5d4315b9-166e3b62-c13d-e4434b523bc0 Could not retrieve max file size: Inappropriate ioctl for device vfat-0.04 (Raw Major Version: 0) file system spanning 1 partitions. File system label (if any): Mode: private Capacity 4293591040 (65515 file blocks * 65536), 3747414016 (57181 blocks) avail, max supported file size 0 UUID: 5d4315b9-166e3b62-c13d-e4434b523bc0 Logical device: t10.ATA_____DELLBOSS_VD_____________________________c6df942833f5001000000000:2 Partitions spanned (on "disks"): t10.ATA_____DELLBOSS_VD_____________________________c6df942833f5001000000000:2 Is Native Snapshot Capable: NO OBJLIB-LIB: ObjLib cleanup done. WORKER: asyncOps=0 maxActiveOps=0 maxPending=0 maxCompleted=0 |
| t10.ATA_____DELLBOSS_VD_____________________________c6df942833f5001000000000: Display Name: Local ATA Disk (t10.ATA_____DELLBOSS_VD_____________________________c6df942833f5001000000000) Has Settable Display Name: true Size: 228872 Device Type: Direct-Access Multipath Plugin: NMP Devfs Path: /vmfs/devices/disks/t10.ATA_____DELLBOSS_VD_____________________________c6df942833f5001000000000 Vendor: ATA Model: DELLBOSS VD Revision: 00-0 SCSI Level: 5 Is Pseudo: false Status: on Is RDM Capable: false Is Local: true Is Removable: false Is SSD: false Is VVOL PE: false Is Offline: false Is Perennially Reserved: false Queue Full Sample Size: 0 Queue Full Threshold: 0 Thin Provisioning Status: yes Attached Filters: VAAI Status: unsupported Other UIDs: vml.0100000000633664663934323833336635303031300000000044454c4c424f Is Shared Clusterwide: false Is Local SAS Device: false Is SAS: false Is USB: false Is Boot USB Device: false Is Boot Device: true Device Max Queue Depth: 31 No of outstanding IOs with competing worlds: 31 Drive Type: unknown RAID Level: unknown Number of Physical Drives: unknown Protection Enabled: false PI Activated: false PI Type: 0 PI Protection Mask: NO PROTECTION Supported Guard Types: NO GUARD SUPPORT DIX Enabled: false DIX Guard Type: NO GUARD SUPPORT Emulated DIX/DIF Enabled: false |
지금까지 살펴본 정보는 다음 계층 구조로 이해할 수 있습니다.

그렇다면, 어떤 Action Plan을 생각해 볼 수 있을까요? 아래 Action Plan들에 대해서 하나씩 알아보도록 하겠습니다.
1) vfat filesystem 정합성 확인
2) vfat filesystem 정합성 확인 오류 시 복구 시도
3) 기존 Partition에 vfat filesystem 재생성
4) 신규 partition 생성 > 신규 vfat filesystem 생성
1) vfat filesystem 정합성 확인
우선, Windows를 사용해보셨던 분들이라면 chkdsk를 많이들 기억하실 겁니다.
ESXi에서도 마찬가지로 Filesystem 별로 정합성을 확인하기 위한 도구를 제공하며, vfat의 경우에는 dosfsck를 이용할 수 있습니다.
dosfsck를 이용할 때 주의할 점은 vfat filesystem이 위치한 partition의 device 경로를 입력해야 합니다.
아래 예제에서 보면, /vmfs/devices/disks/mpx.vmhba0:C0:T2:L0가 physical disk의 경로이고, 첫 번째 partition의 경로는 맨 끝에 ":1"을 추가하여, /vmfs/devices/disks/mpx.vmhba0:C0:T2:L0:1 인 것을 알 수 있습니다.
| [root@esxi6:~] dosfsck -v -V /vmfs/devices/disks/mpx.vmhba0:C0:T2:L0:1 dosfsck 2.11 (12 Mar 2005) dosfsck 2.11, 12 Mar 2005, FAT32, LFN Checking we can access the last sector of the filesystem Boot sector contents: System ID "MSDOS5.0" Media byte 0xf8 (hard disk) 512 bytes per logical sector 65536 bytes per cluster 2 reserved sectors First FAT starts at byte 1024 (sector 2) 2 FATs, 16 bit entries 98304 bytes per FAT (= 192 sectors) Root directory starts at byte 197632 (sector 386) 512 root directory entries Data area starts at byte 214016 (sector 418) 49116 data clusters (3218866176 bytes) 32 sectors/track, 64 heads 0 hidden sectors 6287360 sectors total Starting check/repair pass. Checking for unused clusters. Starting verification pass. Checking for unused clusters. /vmfs/devices/disks/mpx.vmhba0:C0:T2:L0:1: 0 files, 0/49116 clusters |
2) vfat filesystem 정합성 확인 오류 시 복구 시도
dosfsck -v -V 옵션 실행 결과 -a -w 옵션을 이용하여 복구를 시도할 수 있습니다.
| [root@esxi6:~] dosfsck -a -w /vmfs/devices/disks/mpx.vmhba0:C0:T2:L0:1 |
3) 기존 Partition에 vfat filesystem 재생성
경험 상, Filesystem은 대부분 복구가 정상적으로 완료되지 않습니다.
훼손된 Filesystem은 백업본을 이용하여 복구를 진행하는 것이 대부분입니다.
Boot Record나 Boot Sector가 훼손되는 경우에는 Disk Layout을 이용하여 복구를 수동으로라도 시도해 볼 수 있지만 Filesystem 자체 훼손은 수동으로 복구를 시도하는 것이 매우 어렵습니다.
따라서, 이 케이스에서도 vmkfstools 도구를 이용하여, 간단하게 vfat filesystem을 재생성하는 것을 고려해 볼 수 있습니다.
vmkfstools 도구를 이용하기 전에 vfat filesystem이 위치한 partition의 device 경로를 정확히 확인해야 합니다.
| [root@esxi6:~] vmkfstools -C vfat /vmfs/devices/disks/mpx.vmhba0:C0:T1:L0:1 create fs deviceName:'/vmfs/devices/disks/mpx.vmhba0:C0:T1:L0:1', fsShortName:'vfat', fsName:'(null)' deviceFullPath:/dev/disks/mpx.vmhba0:C0:T1:L0:1 deviceFile:mpx.vmhba0:C0:T1:L0:1 Checking if remote hosts are using this device as a valid file system. This may take a few seconds... Creating vfat file system on "mpx.vmhba0:C0:T1:L0:1" with blockSize 1048576 and volume label "none". Filesystem was created but mount failed on device "mpx.vmhba0:C0:T1:L0:1".: Not found. Successfully created new volume: 6319bb1e-0e6120f6-ec54-005056b6839d |
4) 신규 partition 생성 > 신규 vfat filesystem 생성
물리적으로 문제가 생긴 경우, 기존 partition에 vfat filesystem을 재생성하는것도 올바르게 되지 않을 수 있습니다.
이러한 경우 신규 physical disk에 partitoining을 하는 것부터 진행이 필요합니다.
ESXi에서 partitioning은 partedUtil 도구를 이용하며, partedUtil 도구를 통해 확인되는 정보의 의미를 먼저 알아야 합니다.

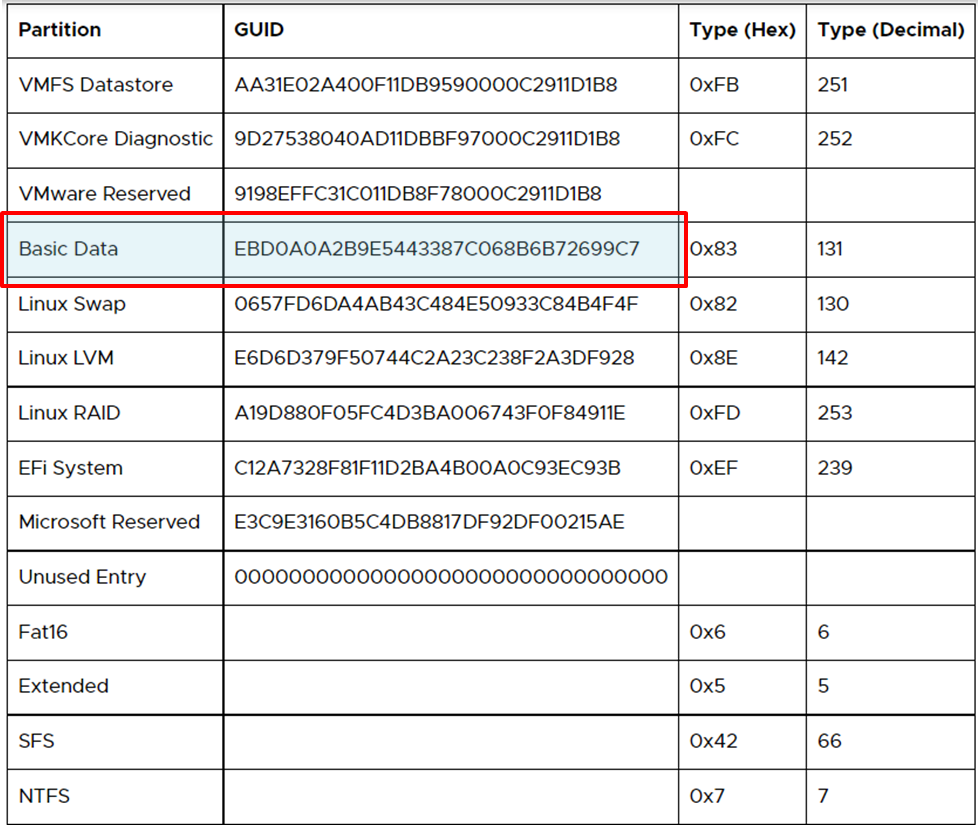
Partitioning을 진행할 때, Starting Sector / Ending Sector / GUID 정보가 반드시 필요하며 Starting Sector와 Ending Sector는 Partition의 크기를 나타내며, GUID는 이 Partition이 어떤 목적으로 사용되기 위해 만들어진 Partition인지를 표현합니다.
Partition GUID는 여러가지가 있으며, 본 예제에서는 Basic Data 용도로 생성합니다.
위에서 확인한 정보를 토대로 신규 Physical Disk에 Partitioning 및 Filesystem을 생성해보겠습니다.
먼저, 신규 Disk의 정보를 확인해보면 Partitioning은 안되어 있으며, 전체 Sector 값인 6291456을 확인할 수 있습니다.
| [root@esxi6:~] partedUtil getptbl /vmfs/devices/disks/mpx.vmhba0:C0:T2:L0 unknown 391 255 63 6291456 |
이 정보를 가지고, 신규 Partition을 생성합니다.
이 때 Starting Sector는 2048을 이용하고(이는 Physical Disk의 Sector Size가 512byte -> 4Kbyte로 증가하면서 필요해진 Disk Alignment를 위한 값입니다.) Ending Sector는 위에서 확인한 전체 Sector에서 Starting Sector를 제외한 값을 입력합니다. 이는 전체 Disk를 다 사용하겠다는 의미이기 때문에 Partition을 더 생성할 예정이라면 필요한 용량만큼만 Sector를 계산하여 사용할 수 있습니다.
| [root@esxi6:~] partedUtil setptbl /vmfs/devices/disks/mpx.vmhba0:C0:T2:L0 gpt "1 2048 6289407 EBD0A0A2B9E5443387C068B6B72699C7 0" gpt 0 0 0 0 1 2048 6289407 EBD0A0A2B9E5443387C068B6B72699C7 0 |
본 예제의 경우에는 전체 Sector인 6291456에서 Starting Sector인 2048을 제외한 만큼을 사용하기 때문에 용량 기준으로는 다음과 같이 계산할 수 있습니다.
6291456(전체 Sector) - 2048(Starting Sector) = 6289408 * 512byte(Sector 크기) = 3220176896 bytes
이제 Partitoin이 생성되었으니, Filesystem을 만들 수 있습니다.
| [root@esxi6:~] vmkfstools -C vfat -S testvfat /vmfs/devices/disks/mpx.vmhba0:C0:T2:L0:1 create fs deviceName:'/vmfs/devices/disks/mpx.vmhba0:C0:T2:L0:1', fsShortName:'vfat', fsName:'testvfat' ... Successfully created new volume: 631a9ac1-f3f3cfba-1f83-005056b6839d |
Filesystem이 정상적으로 만들어졌는지 마지막으로 확인합니다.
| [root@esxi6:~] vmkfstools -Ph /vmfs/volumes/631a9ac1-f3f3cfba-1f83-005056b6839d vfat-0.04 (Raw Major Version: 0) file system spanning 1 partitions. File system label (if any): testvfat Mode: private Capacity 3 GB, 3 GB available, file block size 64 KB, max supported file size 0 bytes UUID: 631a9ac1-f3f3cfba-1f83-005056b6839d Partitions spanned (on "disks"): mpx.vmhba0:C0:T2:L0:1 Is Native Snapshot Capable: NO [root@esxi6:~] dosfsck -v -V /vmfs/devices/disks/mpx.vmhba0:C0:T2:L0:1 dosfsck 2.11 (12 Mar 2005) dosfsck 2.11, 12 Mar 2005, FAT32, LFN Checking we can access the last sector of the filesystem Boot sector contents: System ID "MSDOS5.0" Media byte 0xf8 (hard disk) 512 bytes per logical sector 65536 bytes per cluster 2 reserved sectors First FAT starts at byte 1024 (sector 2) 2 FATs, 16 bit entries 98304 bytes per FAT (= 192 sectors) Root directory starts at byte 197632 (sector 386) 512 root directory entries Data area starts at byte 214016 (sector 418) 49116 data clusters (3218866176 bytes) 32 sectors/track, 64 heads 0 hidden sectors 6287360 sectors total Starting check/repair pass. Checking for unused clusters. Starting verification pass. Checking for unused clusters. /vmfs/devices/disks/mpx.vmhba0:C0:T2:L0:1: 0 files, 0/49116 clusters |
4번 과정은 간략하게 다음 그림처럼 생각해 볼 수 있습니다.

지금까지 Filesystem이 훼손된 경우, 접근할 수 있는 여러 가지 방안에 대해서 정리해보았습니다.
사실 이러한 내용을 다루기 전에 MBR/GPT를 먼저 다뤄야 하는데요. 이 내용은 추후에 글을 작성해보도록 하겠습니다.
[참고 자료]
https://kb.vmware.com/s/article/1036609
https://kb.vmware.com/s/article/2033564
'Storage' 카테고리의 다른 글
| vSAN Health Service - Component Limits (2) | 2023.02.28 |
|---|---|
| vsan-health service was not able to start (0) | 2023.01.23 |
| Port Binding을 이용한 iSCSI Multipath 구성 (0) | 2022.08.22 |
| Windows Server iSCSI Target Portal에서 특정 IP 제외 (0) | 2022.08.21 |
| SCSI Addressing (0) | 2022.08.13 |


